Thursday, April 29, 2010

My very first Blog Hop

Good Morning everyone! I hope you’re ready for the ESAD Blog Hop! Better go grab yourself a cuppa as you’ll be hopping for a while!

What is ESAD you say?

ESAD stands for Extra Special Australian (and New Zealand) Demonstrators and it is an online group just for Australian and New Zealand demonstrators for Stampin’ Up!

We so love what we do and not only do we love to share it with our customers, friends and wonderful blog visitors but we share our love for what we do with each other as Demonstrators. We run swaps, challenges, tutorials, product know how and cyberstamps and we are always there to help and support each other when its needed.

So if you are a Stampin’ Up! Demonstrator located in Australia or New Zealand then please feel free to click here to join our wonderful group.

You should have just come from Rachel Jackson's blog , what fantastic creations.

The theme for this blog hop was Mother's Day, as it is Mother's Day here in Australia next weekend. We also had to use Big Shot products in our projects. I decided to use the scallop circle die. These are my creations.

I have seen a few scallop circle purses on blogs, but since I couldn't find a tutorial, I designed my own. It wasn't that difficult, it just took a little thinking and adding (which I am not too good at!). I started off by making the box for the inside and then decorated the scallop circles to go on the front and back and stuck them on with sticky strip and used some pewter jumbo eyelets to thread the ribbon handles through. 
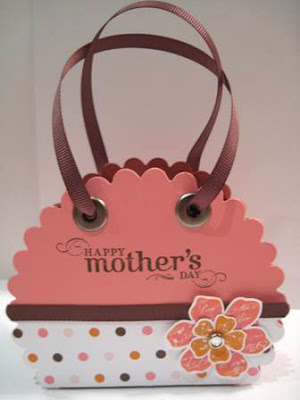
Here is a photo of the box inside.Next up was the card. I had a vision, but when I had made it, it didn't look that great so I had a play around with it, and this is what I came up with. It is called a tent card and is very simple to make. You just make your base card with the fold at the top and then stick the scallop circle on the top of it.
Here is a close up of the scallop circle. I stamped the "Happy Mother's Day" first and then stamped the vine image in pink pirouette all over the rest of the circle. To make the flowers two toned, I inked them with regal rose ink first and then used a dauber to put a little pumpkin pie around the edges. I also stamped three small flowers with pumpkin pie ink and adhered them together with a clear rhinestone.
And now a picture of the inside. I kept it very simple so there was plenty of room to write a message.


Kari Hughes is next on our blog hop, and I am sure she will have something fabulous to show you.

If you make it around all the blogs on this blog hop, and leave comments on them, you could win some blog candy! Yes we have blog candy! There will be two winners, one from New Zealand and one from Australia. All you have to do is visit and leave a comment on each of the blogs in today's blog hop and then send an email to the lovely Sharlene and advise her that you have commented on all the blogs, and give her your name, email address and tell her whether you are from New Zealand or Australia.

I hope you have enjoyed your visit, please come back soon to see what I have been creating.

Til next time, Keep on creating.

xx Nicky

Supplies:
Stamp set: Vintage Vogue, Occasional Greeting
Ink: Chocolate Chip, Regal Rose, Pumpkin Pie
Card: Regal Rose, Chocolate Chip, Whisper White
DSP: Sweet Always
Accessories: Scallop circle die, Big Shot, Circle Scissor Plus, 1/4" chocolate chip grosgain ribbon, linen thread, clear rhinestones, dauber, button, stamp-a-ma-jig, pewter jumbo eyelets

Monday, April 26, 2010

Happy Birthday Kylie

My very good friend Kylie had her birthday last Friday, and this is the card I made for her. When I asked her what she liked, she said anything pink with plenty of bling! I chose the sweet always dsp (my all-time favourite paper pack) and based the colour scheme of regal rose and pumpkin pie on that.

I had just received the new level 2 hostess stamp set, Asian Artistry in the mail, so I thought it would be a great opportunity to have a play with it. I think it is a fabulous stamp set, with some very versatile images, that could be used for a number of different occassions.


I started the card by stamping the image with stazon and then colouring with my blender pen and the pink pirouette, regal rose and pumpkin pie inkpads. I coloured the leaves with kiwi kiss. It looked nice, but a little flat for my liking, so I decided to stamp it again and use dimensionals to paper piece the large flower.

As the image was more oval than round, I used my oval nestabilities to cut out the image and the mats. I used two different pieces of the sweet always paper, one of which I used the eyelet border punch on, to give it a nice finish. I covered the join in the papers with a piece of pumpkin pie ribbon and added three pearls from the pretties kit in the top left hand corner.

On the inside I stamped a couple of sentiments from the retired It's Your Birthday stamp set and then placed another strip of dsp along the bottom, which I matted with more regal rose card.

Once the card was finished, I decided there wasn't enough bling on it, and what better way to add bling than to add some dazzling diamonds over the top of all the flowers. I did this by applying some tombow glue and just sprinkling the dazzling diamonds over the top. I just love the tombow glue, once you put it on, nothing comes off it. Here is a close up of the flowers.

I was very pleased with the end result, a nice girly card with plenty of bling!

If you would like to have this fabulous stamp set in your collection, all you need to do is host a workshop in your own home, or have a catalogue party and it could be yours.

Til next time.

Keep on creating.

xx Nicky

Supplies:
Stamp sets: Asian Artistry, It's Your Birthday
Ink: Stazon, Pink Pirouette, Regal Rose, Pumpkin Pie, Kiwi Kiss
Card: Confetti White, Regal Rose, Pumpkin Pie
DSP: Sweet Always
Other: Stampin' dimensionals, eyelet border punch, oval and scallop oval nestabilities, pumpkin pie 1/4" grosgrain ribbon, dazzling diamonds, tombow multi liquid glue, pearls from pretties kit.

Thursday, April 22, 2010

Fun & Fast Notes Stamp A Stack

I can't believe it has been almost a week since my last post. School went back on Tuesday this week and I have found it very difficult to get back into the "swing" of things. We spent a lot of time sleeping late and just cruising the past two weeks, so trying to get out the door has been somewhat of a challenge all week.

I have the stamp-a-stack cards for my classes this month to share with you. I decided to use the Fun & Fast Notes stamp set. It is one that I like but I haven't used a great deal. I think what appeals to me most about this set is that there are eight different stamps in the set and they cover a wide range of different occasions (well and the fact that you can colour them in!).

I decided to make my cards all 4" by 4" so the stamped image takes up a lot of the front of the card. I wanted to use a colour scheme that went with all the greetings, so decided on the Holiday Treasures dsp, which uses chocolate chip, baja breeze, kiwi kiss and riding hood red.

I started off by making the card bases and then cut a strip of dsp, which I mounted on chocolate chip card. I stamped the image in stazon onto whisper white card and coloured with my blender pens and ink pads. I then rounded the corners, used the slit punch to punch the semi-circle from the right hand side, tied ribbon around and then mounted it all onto more chocolate chip card. I mounted the stamped panel onto the card with dimensionals.

Here are the baja breeze cards:

the confetti white:

the kiwi kiss:

and finally, the riding hood red.


I was really pleased with how they turned out, and think I might make a box to put them in and give them away as a gift.

I'm off to finish off a special birthday card, which I will be able to share with you soon.

Til next time...

Keep on creating

xx Nicky

Supplies:
Stamp Set: Fun & Fast Notes
Ink: Black Stazon, Riding Hood Red, Baja Breeze, Kiwi Kiss, Chocolate Chip
Card: Whisper White, Riding Hood Red, Baja Breeze, Kiwi Kiss, Confetti White
DSP: Holiday Treasures
Accessories: Corner rounder and slit punch, riding hood red taffeta ribbon, kiwi kiss and baja breeze 5/8" striped grosgrain ribbon, whisper white 1/4" grosgrain ribbon, stampin' dimensionals, blender pens

Friday, April 16, 2010

Congratulations

A very special couple celebrated their 50th wedding anniversary a couple of weeks ago, and this is the card I made for them.

I wanted an elegant colour palette and while flicking through my card sample box I came across a card that I had received from Carol Dunstan, which was just the colours I was looking for. She had used champagne glasses on her card and I thought they were perfect. I changed the card around a bit to make it my own, and this is what it ended up looking like. I started off with the going gray card base and stamped En Francais all over it with versamark ink. I stamped the congratulations sentiment in basic gray ink, cut it out and then used my slit punch to make the rounded pieces on the four corners. I mounted it onto a piece of basic gray cardstock and then placed some pearls in each corner.

The strip of paper comes from the bella bleu dsp. which I also mounted onto basic gray card. I stamped the champagne glasses in stazon ink, coloured the champagne with my barely banana marker and then placed two way glue on top and sprinkled dazzling diamonds over it. I then used the 1 1/4" circle punch to punch it out, did a 1 3/8" circle out of basic gray and mounted them both together.

I tied a piece of whisper white 1/4" grosgrain ribbon around the block and did one of Teneale's special bows with taffeta ribbon, finishing it off with a button from the button latte pack.

Here is a close up of the champagne glasses and bow.

I stamped "Happy Anniversary" on the inside as well. I was really pleased with the card, and I am sure Noni and John loved it too.

Til next time.

Keep on creating.

xx Nicky

Supplies:

Stamp Set: Cheers to you, cheer and wishes, En Francais
Ink: Black stazon, basic gray, barely banana
Card: Basic gray, going gray, whisper white
DSP: Bella bleu
Accessories: 1/4" white grosgrain ribbon, white taffeta ribbon, button latte button, slit punch, 1 3/8" and 1 1/4" circle punches, pearls, two way glue, dazzling diamonds, stampin' dimensionals

Tuesday, April 13, 2010

Cheers to you

This is the card I made for my brother-in-law's 40th birthday this week. It was a no-brainer as to what stamp set to use - Mark loves beer - well most males do!

I had a quick flick though my papers looking for something that had a yellow/cream in it about the colour of beer and came up with this one from the windsor knot paper pack.

I used chocolate chip for the card base (I am going to challenge myself not to use chocolate chip on my next card, as I seem to use it on just about every card I make!).

I put the paper on the base and then did a strip of sage shadow with chocolate chip on top. I ran a piece of vanilla taffeta ribbon around the block and placed one of the large cream grommets over the top of the ribbon and tied in a knot in the centre of it. I stamped 8 of the beer mugs onto some whisper white card and coloured them in with my blender pens and so saffron and more mustard ink. I then cut them all out and mounted 7 of them onto the block with some dimensionals. I stamped the sentiment (using my stamp-a-ma-jig) in chocolate chip ink, stamped it out with the large oval punch and then cut it off just under the sentiment, before adhering it to the card front.

Here is a close up of the beer mugs.
I finished off the inside of the card too. I was doing this a lot last year, but I guess have just been a bit lazy lately, so haven't been doing it so much.

This is the inside. I just stamped "happy 40th birthday" across the middle, with my stamp-a-ma-jig for perfect placement, did a strip of card and dsp along the bottom and adhered the last beer mug with a dimensional.

I hope Mark likes it.

Keep on creating.

xx Nicky

Supplies:


Stamp Sets: Cheers to You, It's your birthday(R), unknown numerical
Ink: Black stazon, more mustard, so saffron
Card: Whisper white, chocolate Chip, sage shadow
DSP: Windsor knot
Accessories: Vanilla large grommit(R), vanilla taffeta ribbon, stampin' dimensionals, blender pens, large oval punch, stamp-a-ma-jig

Sunday, April 11, 2010

Tealight gift box

I made this beautiful tealight box for a thank you present this week. It is really easy to make, and I think it is a stunning gift. What do you think?I used chocolate chip for the base and inside and rich razzleberry for the lid. I stamped the outline flower from cottage garden all over the lid with rich razzleberry ink before I adhered the acetate to the inside of the lid. A piece of the gorgeous new rich razzleberry ribbon tied around and the tag from the cottage garden stamp set, and the box was ready to fill up.

This is what the inside looks like.

The tealights fit perfectly in the middle of the scallop circles.
I tried to stamp on the candles with the little butterfly stamp, and wasn't too successful, however I have received further instructions on how to make a better job, so will try it out and get back to you with how it goes.

Here is a close up of one of the candles sitting inside the scallop circle.
I hope the person who is going to receive it likes it.

Next time, I have a birthday card I made for my brother-in-law.

Keep on creating.

xx Nicky

Supplies:
Stamp Set: Cottage Garden
Ink: Rich Razzleberry, Chocolate Chip
Card: Rich Razzleberry, Chocolate Chip
Accessories: Scallop circle punch, sticky strip, rich razzleberry polka dot ribbon, hemp twine, acetate, tealights

Thursday, April 8, 2010

Happy Birthday Jess

Well it is Jess' 6th birthday today and there is so much excitement in our house. We are off to the Easter Show for the day, so fingers crossed it doesn't rain.

I ordered the Pony Party stamp set to make Jess' card and then realised last weekend that it wasn't going to be here in time, so after making a couple of phone calls I managed to borrow one from Christie (thank you so much Christie).

I had so much fun making this card, the stamp set is a fabulous one for little girls' cards, especially if you like paper piecing and colouring as much as me!

I had Jess pick her favourite dsp, so I had a starting point. I stamped the image twice in stazon ink and coloured it with my blender pen, then paper pieced it so it had lots of dimension. I did lots of layering and finished the card off with a faux bow (the instructions for which came from the ultra talented Teneale Williams). I used lots of two way glue and dazzling diamonds to give the card some "bling".

This is the inside. And a close up of the pony.
Just a short post today as the kids are itching to get going. Hope you all have a fabulous day.

Til next time.

Keep on Creating.

xx Nicky

Supplies:
Stamp Sets: Pony Party, It's Your Birthday(R)
Ink: Black Stazon, Pirouette Pink, Riding Hood Red
Card: Whisper White, Riding Hood Red, Pirouette Pink
DSP: Bella Rose
Accessories: Eyelet border punch, stampin' dimensionals, riding hood red taffeta ribbon, sherbet button(R), two way glue, dazzling diamonds, blender pens

Wednesday, April 7, 2010

Swap cards

Today I have a couple of swap cards to share with you. The first I received from my good friend Kylie Swain. Her blog address is http://www.kraftykylie.typepad.com if you would like to go and check out some more of her fabulous creations.
Kylie used Rich Razzleberry for her card, the matching polka-dot ribbon, the new top note die for the big shot and the Fifth Avenue Floral stamp set. She has mounted the large flower on dimensionals. A gorgeous card Kylie.

The next card was made by Christie Wallace. When I received it I thought WOW. It is so cute and I do so love cute cards. Check out Christie's blog at www.christiescreativecorner.blogspot.com for more amazing creations.
Christie has used the new Fox and Friends stamp set. She has stamped each of the images and then mounted them on a matching piece of cardstock before placing on the card front with dimensionals. The chocolate chip, pumpkin pie and old olive colour scheme are fabulous together. I love the card Christie and am definately going to have to CASE it.

I am off to do some creating of my own, so check back soon and I will have more to share with you.

Til next time,

Keep on creating.

xx Nicky

Monday, April 5, 2010

The new Autumn/Winter Mini is Here

I am super excited, there are so many fabulous new products in this bigger than usual mini catalogue, including:

* The Sizzix Big Shot machine with fabulous Stampin' Up! exclusive dies
* Clear-mount rubber stamps using the same high-quality rubber and foam we all love
* A new punch style with a sleeker body
* Three brand new in-colour colours
* Two new designer series papers and matching stamp sets
* Not to mention all the new stamp sets.

If you would like me to mail you a copy of the new mini catalogue, please email me at nickyadamson@aol.com and I will "pop one in the post", or if you can't wait, click on the catalogue on the right and it will download direct to your computer.

Now I have some projects to show you, using new products from the mini catalogue. We made the following cards at our team training day, with all being designed by the super-talented Jayne Mercer.


This card uses the new polka dot textured impressions embossing folder, together with the little leaves die, thanks embosslits die and cottage wall designer series paper. You may have noticed a new colour, it is one of the new in-colours and is called Rich Razzleberry.

This card also uses the new dsp and polka dot embossing folder, together with the extra large two step bird punch, rich razzleberry polka-dot grosgrain ribbon, medium jewellery tag punch and the matching stamp set tiny tags.

This card was made using another new in-colour Soft Suede and the new Manhattan Flower textured impressions embossing folder, a little soft suede polka-dot grosgrain ribboon and another sentiment from the tiny tags stamp set and this card was finished.

We made swap cards for the training day and this was my swap card. I designed it before I realised there were 40 people going, and that I would need to cut out 240 flowers! Needless to say I took a bag of flowers and scissors with me everywhere I went the week before the training day, but managed to get them all done.


For my card I used the cottage garden stamp set. I started by using the polka dot embossing folder on a chocolate chip card and cut out the largest oval from the ovals die for the big shot. I sponged around the edge with chocolate chip ink, and then stamped the sentiment in the middle. I stamped the flowers in rich razzleberry and melon mambo (the other new in-colour), cut them out and mounted them with dimensionals around the oval. I was going to put some bling on it, but ran out of time.

I hope you have enjoyed looking, I will have some more new catalogue cards to show you next time.

Keep on creating.

xx Nicky


Saturday, April 3, 2010

Happy Easter #2

As promised I am back with the easter card I sent to my Nana last week. I think this card is called a sidestep card, however I didn't have any instructions I just adapted the double stair step card until it looked the way I wanted it to.

As I still had the tea party paper out on my desk from my previous card, I decided to use that for this card also. I started off stamping the egg from the good egg stamp set onto the green dsp and cut them out and put them together and played around with the various colour combinations until I found one I liked. This is the result.

I had the chicken sitting on a plain white background but found that was too stark, so I ended up using a sponge and sponged pretty in pink ink all over the background. I wasn't extremely happy with the left hand side of the card but I couldn't work out what else to do, and as it had to be mailed to New Zealand, I decided to just send it as it was. A good decision as Nana absolutely loved it.

This is a picture of the side of the card.


I have some new winter mini catalogue projects to share with you next time.

Keep on creating.

xx Nicky


Supplies:

Stamp Set: A good egg
Ink: Black stazon, pretty in pink, summer sun, pumpkin pie
Card: Whisper white, certainly celery, so saffron, pretty in pink
DSP: Tea party
Accessories: Word window punch, sponges, blender pens, dimensionals

Friday, April 2, 2010

Happy Easter

A good eggCan you believe it is Easter already? I'm not really sure where the first three months of this year have gone. I have an easter card to share with you today. It is a CASE from one I saw on the extremely talented Jenny Moors' blog a couple of months back. It was just so stunning I knew I had to make one to send to my parents.

It is a double stair step card, which looks very complicated, but I was surprised at how easy it was to make. It uses the good egg stamp set and tea party designer series paper. I put my own mark on it by using the mat pack to pierce holes around the block that has the eggs on it and then did some faux stitching with my white gel pen.

Here is a picture of the side of the card. It has an extra strip of cardstock added to the back "step" so the eggs can sit on it.


If you would like instructions on how to make this card, or a double stair step card, please email and I will be more than happy to share them.

I have another easter card to show you tomorrow, this time the one I sent to my Nana.

Keep on creating.

xx Nicky

Supplies:

Stamp set: A Good Egg
Ink: Black stazon, summer sun, pumpkin pie, pretty in pink
Cardstock: Whisper white, almost amythest, pretty in pink,
DSP: Tea party
Accessories Soft subtle brads, scallop circle and 1 3/8" punches, blender pens, mat pack,
white gel pen