Monday, September 13, 2010

For you

This was one of the cards we made at a recent catalogue launch.It uses the new for you flower and matching punch together with the vintage wallpaper embossing folder. With all the punches it was a really quick card to make and is really pretty.

Til next time,

Keep on creating.

xx Nicky

Supplies:

Stamps: for you flower
Cardstock: black, regal rose, whisper white
Ink: black, regal rose
Big shot: vintage wallpaper embossing folder
Punches: 1 3/8" circle, 1 1/4" circle, fancy flower extra large
Other: dimensionals

Wednesday, September 8, 2010

Join my Team

If you have ever thought about becoming a Stampin' Up! demonstrator, now is the time to do it.

The demonstrator starter kit has been reduced in the new catalogue to only $289 and if you join between now and 15 October, you will receive for FREE a complete set of InColours - that's ink pads, markers and an assortment of cardstock - all absolutely FREE. The starter kit has over $515 worth of stamping and business supplies. Add to that the 30% discount you receive on your first $300 order placed within 45 days of joining and there really is no better time to become a Stampin' Up! demonstrator.

If you would like to learn more about becoming part of my team, please do not hesitate to contact me.

Keep on creating.

xx Nicky

Sunday, September 5, 2010

Happy Father's Day

I hope all you fathers out there are having a fabulous day.

This card is another case from Amy. As soon as I saw it I knew it would perfect for my Dad's fathers day card.

It uses the lovely as a tree stamp set, which has been inked up using old olive, garden green and chocolate chip markers. I have inked stamps with markers before but had never thought of doing it with this stamp set. I think the result is stunning.


We used baja breeze, bashful blue, certainly celery and old olive to sponge the background. A few buttons along the bottom tied with linen thread, a piece of ribbon and the happy fathers day sentiment and it was finished.

I was really happy with it and hope Dad likes it too.

Keep on creating.

xx Nicky


Supplies:
Stamp Sets: lovely as a tree, teeny tiny sentiments
Card: crumb cake (kraft), chocolate chip, garden green, whisper white
Ink: garden green, old olive, certainly celery, bashful blue, baja breeze, chocolate chip
Punch: word window
Other: chocolate chip ribbon, linen thread, sponges, buttons

Thursday, September 2, 2010

Christmas Card #1

There were so many very talented people with amazing cards at our weekend away that I case'd quite a few cards. I found I got a lot more done and it was a great way of getting heaps of samples together for new catalogue products. Here is a card I case'd from Amy Anderson, you can check our her blog here.

This card uses the new stamp set called Contempo Christmas. It has this beautiful bauble in it, which has a matching punch - how easy is that!

We used rich razzleberry and the new (old) wild wasabi. Some of you might remember wild wasabi was an incolour from our 2008-2009 catalogue. There is a new punch used behind the merry christmas, it is called the modern label punch and I love it too. It layers beautifully with the word window punch. This card was so quick and easy to make, I think it would be a great one to mass produce.

Amy is such a "bling" girl that most of the cards she made on the weekend away had dazzling diamonds on them somewhere, with this one being no exception. It has a fine (well mine was a little thicker than hers) line of dazzling diamonds along the top of the wild wasabi piece.

Thanks Amy for a fabulous design.

Next time, the Father's Day card I made for my Dad.

Keep on creating.

xx Nicky

Supplies:
Stamp sets: contempo christmas, teeny tiny sentiments
Card: rich razzleberry, wild wasabi, whisper white
Ink: rich razzleberry, wild wasabi
Punches: ornament, modern label, word window
Big Shot: perfect polka dot embossing folder
Other: 2 way glue pen, stampin' dimensionals, dazzling diamonds, mat pack

Wednesday, September 1, 2010

The much longed for new catalogue is here ...


And what a beauty it is. There are heaps of new products including 60 new stamp sets, 7 new punches, all new scrapbooking kits, card kits, ribbons, accessories and so much more. If you would like to view the new catalogue, please click on the image to the right of this post, or if you are like me and need one to hold in your hands for $15.00 I can post one out to you, just drop me an email.

I have already placed my first order and I can't wait for the Australia Post man to come knocking on my door so I can play with all the new goodies.

I have another card to share with you tomorrow, so until then ...

Keep on creating.

xx Nicky

Tuesday, August 31, 2010

Father's Day #1

I am back, as promised! The new catalogue has so many amazing cards in it that when I saw this one, I knew it would be perfect for David's card. It was really simple to do, and uses the star jumbo wheel. I rolled it out in pumpkin pie and then did a so saffron, real red and garden green one, cut the stars out and mounted them on dimensionals.

The sentiment is from the teeny tiny sentiments stamp set (which I love) punched out with the word window punch.

Our new catalogue goes "live" tomorrow and I can't wait. I have my "must have" list all written out and I will be placing my order as soon as I can. If you would like to receive one of the new catalogues please email me at nickyadamson@ymail.com.

I have a christmas card to share with you next time ... using a brand new christmas stamp set.

Keep on creating.

xx Nicky


Wheel: Star jumbo
Card: Tempting turquoise, whisper white, real red, so saffron, garden green
Ink: Tempting turquoise, pumpkin pie, real red, so saffron, garden green
Other: Large and small star punches, word window punch, stampin dimensionals

Sunday, August 29, 2010

New wheel...

Well I have been home a whole week but trying to find time to take photos of all the cards I made while I was away, edit them and blog them has been difficult. Life seems to be so busy at the moment.

What a fantastic weekend it was. There were 27 amazingly talented ladies, loads of inspiration, new goodies to play with, great food and not much sleep!

First up is a sneak peak of a new jumbo wheel that is in the new catalogue which is released on Wednesday. I had seen it in the US catalogue and fell in love with it then, so when it was included in our pre-order, it was at the top of my wish list.

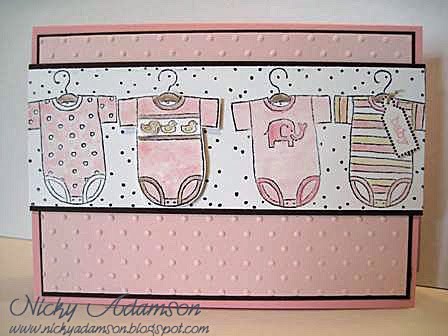
For this card I used pretty in pink, pink pirouette and chocolate chip. I inked the wheel with stazon ink and then rolled out two images, the first I cut to fit the card front then coloured it and the second I just coloured the duck jumpsuit. I cut it out and mounted it onto the first one. Here is a close up of the duck suit.
For the sentiment I stamped the outline from tiny tags and stamped the baby in the middle then used the matching punch to punch it out - gotta love that, so quick and easy. I then used linen thread to tie it onto the coathanger. Here is a close up.

I have a father's day card to show you next, so be sure to check back in a couple of days to see it.

Til next time,
Keep on creating.

xx Nicky

Supplies:

Stamps: Tiny tags
Wheel: Baby Tees jumbo wheel
Card: Chocolate chip, pretty in pink, pink pirouette, whisper white
Ink: Chocolate chip, pretty in pink, pink pirouette, so saffron
Big Shot: Perfect polka dots embossing folder
Other: Jewellery tag punch, stampin dimensionals, blender pen, linen thread

Thursday, August 19, 2010

Weekend away

We have our annual INKlings weekend away this weekend and I cannot wait! My mojo seems to be taking a break at the moment, so I am hoping that a whole weekend away with some like minded crafty people will bring it flooding back! I will be back early next week to start sharing some of the amazing creations I have made ... not to mention the swap card I made.

Til next week.

Keep on creating.

xx Nicky

Wednesday, August 11, 2010

It has been a bad week in our house. David's Nan passed away at the grand old age of 98. What a fantastic lady she was. She was still living by herself and was fit and active right up until the last few months. I wish I had half the energy she seemed to have. I remember her telling me a story a few years ago about the people she was delivering meals on wheels to, and how they were 20 years younger than her! We will miss her so much, especially christmas with the whole extended family at her house.
I have also had Jess off school this week with a really bad bout of conjunctivitous. The noise and mess has been out of this world. Unfortunately Jess likes talking as much as me, and she has constant conversations with imaginary people!

So.... not surprisingly I haven't felt like creating much ... hopefully my blue mood will lift soon and I will get back to my craft desk. I have a few projects I want to get done and new pre-order stamp sets to play with ... I will see how I go.

Keep on creating.

xx Nicky

Wednesday, August 4, 2010

New Medallion stamp

When I first got the new mini catalogue, I wasn't sure whether I wanted to buy the large medallion stamp, but I have seen some amazing things done with it, so of course I just had to get it! For this card I stamped the medallion in regal rose ink on the white card and then inked up the en francais stamp with a dauber in mellow moss ink, making it darker in patches and very light in others. I then stamped it over the top of the medallion. I used the dauber to put some ink around the edge of the white block. I then mounted it onto mellow moss card, and mounted that onto an always artichoke card base.

I used the vintage vogue flowers and a sentiment from the sincere salutations set for the main panel.
I stamped the background of the main panel with the en francais again (only this time I stamped off the ink twice before stamping on my panel). I cut the flowers out and then adhered them with a brad.

For the block through the centre of the card, I had a go at the "suede" technique. It is an awesome technique and one I am sure I am going to use a lot. You rough the paper up a lot and then peel it apart, using the inside fluffy portion as the "suede" panel. Here is a close up:Well that's it from me today, I will be back in a couple of days to share more.

Til next time, keep on creating.

xx Nicky

Supplies:

Stamp set: Medallion, en francais, very vintage, sincere salutations
Ink: Mellow moss, always artichoke, regal rose
Card: Always artichoke, mellow moss, whisper white
Other: Silver brad, sponge dauber

Tuesday, August 3, 2010

It's your last chance...

to get hold of some fabulous products that are being retired and will not be in Stampin' Up!'s new catalogue which is released next month. With the colour renovation and new punch body shape, the last chance list is a whopping 8 pages long, which is the biggest ever. To view the list, click on the link here.

Products in the last chance list are only available until 31 August or while stocks last, whichever occurs first.

Demonstrators have been advised that some items have very low stock levels, so if there are any items you absolutely cannot live without, please email me or call me on 0407-418-063 with your order as soon as possible, so you don't miss out.

Keep on creating.

xx Nicky

Friday, July 30, 2010

Best Wishes

I told you I would be back!

The card I have to share with you today is one a fellow INKlings team-mate made at a recent get together. Ryn was making them for a school fete. If you want to check out some of her other amazing creations, view her blog here.


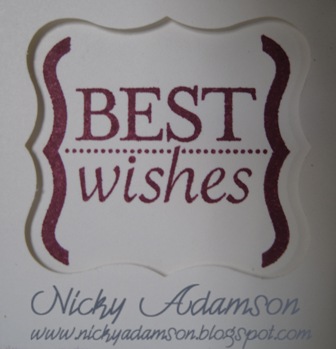
This card is so easy and very effective when finished. All you do is make a card base out of whisper white card, stamp the medallion stamp in the top left hand corner, use the curly label punch on the bottom of the right hand side and then stamp the sentiment in the hole. I used my stamp-a-ma-jig for this to ensure it was perfectly placed. The last thing I did was use some tombow glue on the middle of the medallion and put some dazzling diamonds on top.

Here is a close up of the sentiment window.

I made mine in rich razzleberry ink, but Ryn was making all different colours and they looked fabulous.

These cards are so quick to make and not something I would normally do, as I end up with lots of layers on my cards, but I loved making it and will definately be making lots more. Thank's Ryn for the inspiration.

Thanks for stopping by.

Keep on creating.

xx Nicky

Supplies:

Stamps: Medallion, curly label punch bundle
Ink: Rich razzleberry
Cardstock: Whisper white
Punches: Curly label
Other: Tombow glue, dazzling diamonds, stamp-a-ma-jig

Wednesday, July 28, 2010

I'm back!

Well it's been a long time between posts. We have had school holidays here for two weeks, with me having a cold for the first week. We were supposed to go away for the second week, but decided to stay home and do some fun stuff in Sydney. We had a ball and went iceskating, to the Australian Museum, to Imax, the bike park and lots more. I even managed to get in some crafting with my friends.

My Auntie arrived to stay from New Zealand this week and last week I decided to finally finish off unpacking and sorting the kids room and my craft room. I have attempted this a couple of times but every time I have been to Ikea to buy the bookcases they haven't had them in stock. However this time I went they did have them, so I have had a major cleanout and unpacked all the boxes we had left from when we moved. Unfortunately when I do these major clean outs, I have more mess than ever and it seemed as if it was never going to get tidy again, but fortunately by 2.30pm on Monday afternoon it was all sorted (which was lucky as I had to leave home at 2.50pm to collect Jess from school and then go straight to the airport!).

Sam is home sick today, he woke me up at 4am this morning and has been vomitting every 20 mins. Poor little thing, but he seems to be on the mend now. It is a cold miserable rainy day here in Sydney, so it has been nice to be curled up on the couch with him watching a movie.

The card I have to share with you today is one I made for a friend who recently took possession of her newly built home. It was case'd from one I saw on the convention swap board, but unfortunately I have no idea who to credit for it.


I started off by stamping the neighbourhood jumbo wheel across a piece of basic gray cardstock and another one across some barely banana card (you only need to cut a window out of the banana one). I then cut around the buildings and adhered them onto a piece of basic black card. I punched out a moon from the barely banana card and stamped the owl wih basic gray ink onto whisper white card and cut it out. I used the Big Shot and cut out two of the little leaves dies and stuck it all together. The last thing I did was stamp "congratulations" from the teeny tiny sentiment stamp set and punch it out with the word window punch and adhered that.

Next time I have a very simple single layer card to share with you. I have already done the post and it is scheduled to come up on Friday, so don't forget to stop by and check it out.

Til next time, keep on creating.

xx Nicky


Supplies:

Stamp Sets: Fox and Friends, Teeny Tiny Sentiments, Neighbourhood jumbo roller wheel

Ink: Basic Gray, Stazon
Cardstock: Basic black, basic gray, whisper white, barely banana
Big Shot: Little leaves die
Punches: 1" circle, word window

Thursday, July 8, 2010

INKlings Christmas In July Blog Hop

Welcome to The INKlings’ Team’s Christmas in July blog hop. You may have arrived here from Beth Stewart's blog or just be visiting my blog, whichever way once you’ve checked out my creations you can continue the hop through the link at the end of this post to the next team member.

How quick is this year going! Have you started to think about your Christmas cards and projects yet? The INKlings team has and we thought that this month was the perfect time to host a Christmas in July blog hop. You'll find lots of great ideas provided by 19 team members’ fantastic blogs.

Want to win some Blog Candy? Simply leave a comment on each blog and then email Christie Wallace HERE and let her know you’ve done so and you’ll be in the running for a fantastic prize of 19 handmade cards plus other goodies.

Sorry Blog Candy prize not available to SU! demonstrators but you're more than welcome to leave us a comment!

When I was trying to decide what to do for this blog hop I had a look through my stash for some inspiration. First up I decided on the holiday lineup stamp set. I love this set because as you may already know I love colouring in! Unfortunately I don't have much dsp left, and I am trying not to buy any more before the new catalogue comes out, so when I came across the ski skope paper I decided to use that. The ski slope paper really appeals to me as I love papers with white in them. I love the freshness that white adds to any project.

These are my creations:

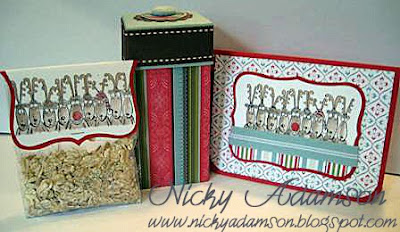
For the card I stamped the image onto some whisper white cardstock and coloured it with my inkpads and blender pen. I cut the image panel out and then mounted it onto some real red card, added some ribbon and then mounted it onto the card front.
My next project is a fantasy box. I made one of these for my Mum's birthday last year and really enjoyed making it. They are great for putting small presents in.
Here is a picture of the inside and the lid:
Last up is some reindeer food. A couple of years ago when we were in New Zealand for Christmas Jess and Sam were very concerned that Santa wouldn't know where to stop to leave their presents. We sprinkled reindeer food on the lawn and have done it every year since. I made some and placed it in a plastic bag, then put a topper on the bag.

Well that’s all from me. Next stop on the INKlings’ Team Blog Hop is Clare McIllhatton. Have fun and don't forget to leave a comment on each blog to win some great Blog Candy.

Til next time.

Keep on Creating

xx Nicky

Supplies:
Stamp sets: Holiday Lineup
Ink: Black stazon, close to cocoa, creamy caramel, real red
Card: Real red, baja breeze, whisper white
DSP: Ski Slope(R)
Punches: Scallop circle, 1 3/8" circle, 1 1/4" circle
Big Shot: Top note die

Other: Corduroy button(R), baja breeze ribbon, chocolate chip ribbon, staple

Saturday, July 3, 2010

Sesame St inspired card

Paula and Brent's daughter turned 2 in January this year and since we were on holiday I completely missed her birthday. When I found out about their wedding, I decided to take Diaz a belated birthday present.

I made these Sesame Street characters a while ago, so decided to use them on her card. They are all really easy to make, as they are made using Stampin' Up! punches.

And a close up of Big Bird (Diaz loved playing with his beak!).


School holidays start this week in New South Wales and we have lots of activites planned. I hope to get some blogging done too. Hope you all have a great weekend.

Keep on creating.

xx Nicky

Wednesday, June 30, 2010

Wedding Card

David and I have just been to Hamilton Island for one of my best friends' wedding. Paula and Brent won their wedding through a radio station competition in New Zealand! How lucky were they... What an awesome time we had. Unfortunately the break away without the kids was way too short, but nice to get away and recharge the batteries.

This is the card I made for Paula. It uses the for the bride stamp set. I wanted an elegant card, so I used a cream and gold colour scheme.

I stamped the image with a gold inkpad and then made a mixture of clear embossing powder and dazzling diamonds, to give it some bling. This is what the embossed image looks like (unfortunately the bling didn't photograph very well).


As Brent and Paula were staying for a few days after the weeking, we decided to give them some AUS$ for their present. This is the money wallet I made.

And finally, a photo of the happy couple.

Til next time,

Keep on Creating.

xx Nicky

Thursday, June 17, 2010

Swap card

Our team, the INKlings, regularly have training days and at these training days we quite often exchange swap cards. The card I have to share with you today, was one that I designed for our most recent swap. I knew what I wanted to do, but was unsure of what colours to make the card with. After a quick flick through my dsp stash to see what papers I had enough of, I had three choices, and in the end I chose this paper from the Bella Rose paper pack. Here is my card. It is made using one of my favourite colour combinations, riding hood red and pirouette pink. The design is a Mojo Monday sketch from a while ago that I had saved onto my computer. Using sketches are great, as it takes all the thinking out of designing your cards.

For the white panels, I stamped the Birthday Cheer and Wishes sentiment first and then put them through the Big Shot with the perfect polka dots embossing folder. The top panel was done by punching out a 1 1/4" circle and placing it over the end of the panel. I then had to use the crop-a-dile to punch some small holes to put the ribbon through.

The cocktail glass was stamped in stazon on some whisper white card and then coloured with my blender pen and inkpads. I used the 1 1/4" circle punch to punch it out, and mounted it onto a 1 3/8" pirouette pink circle and a riding hood red scallop circle. To give it a little dimension, I stamped the umbrella again on a scrap of card, coloured it in, cut it out and then mounted it over the original with dimensionals. Here is a close up of the cocktail glass.
I should have used some crystal effects or dazzling diamonds on the glass, but as I was running out of time to get them finished, this had to do. What do you think I would love to hear your comments.

Wow I have done a good job posting this week - three posts - maybe I am back on track again - here's hoping!

Keep on creating.

xx Nicky

Supplies:

Stamps: Cheers to You, Cheer and Wishes
Card: Whisper White, Riding Hood Red, Pirouette Pink
DSP: Bella Rose
Ink: Black stazon, Riding Hood Red, Pirouette Pink, Tangerine Tango, Pacific Point
Punches: Scallop circle, 1 3/8" circle, 1 1/4" circle
Other: Big Shot Polka Dot Embossing Folder, Riding Hood Red Taffeta Ribbon, Crop-A-Dile, Stampin' Dimensionals, Blender Pen

Tuesday, June 15, 2010

6x6 scrapbook page

I recently joined a 6x6 scrapbook page swap with some of my INKlings team-mates. I admit I struggle making 12x12 pages and since I don't print photos, I don't complete that many layouts. However I found the 6x6 page much easier to put together. Here is my page.
I used the Urban Garden dsp as my starting point and designed the page using not quite navy and kiwi kiss.

I background stamped the grass from the Inspired by Nature stamp set all over the not quite navy base with versamark ink, and used the outline alphabet stamp set to do my title. I cut around it and then mounted it with dimensionals. Here is a close up of the title.

I was really happy with my page and it came together really quickly. I think I might be going to make a lot more 6x6 scrapbook pages.

Next time, I have a swap card to share, so make sure you call back in a couple of days.

Keep on creating.

xx Nicky


Supplies:

Stamp sets: Inspired by Nature, Jumbo Outline Alphabet
Card: Not Quite Navy, Whisper White
DSP: Urban Garden, Bella Rose
Big Shot dies: Little leaves
Other: Scallop edge punch, Stampin' Dimensionals

Friday, June 11, 2010

Happy Birthday Riley

My best friend's little boy Riley turned 2 a few weeks ago. He is a very special little boy and since we share a birthday, I had to make sure he got a very special card. They had his party at the Train shed and all the kids got to ride the Thomas the Tank Engine trains. Unfortunately his party was on during convention so I couldn't go, but Jess and Sam went and had a ball. When I found out what they were doing for his party, it didn't take long for me to decide what I wanted to do for his card. This is what I came up with. I used the Choo Choo stamp set and the people from All in the Family. The presents are from the Loads of Love Accessories stamp set. I was unsure of what colours to use, but Jess suggested tempting turquoise as it is the same colour as Thomas.

I started by using the track roller wheel and then sponged some kiwi kiss and bashful blue lightly over it to make it look like a field. I stamped the people and presents on scrap card then coloured them with my blender pens and inks and cut them out. I mounted them with dimensionals. Here is a close up of "Jess" and the presents.
I wrote Riley's name in white gel pen in the smoke to personalise the card. Here is a close up of "Sam" and the smoke. I was really happy with how it turned out and Belinda loved it.

Thanks for stopping by. Til next time.

Keep on creating.

xx Nicky

Supplies:

Stamps: Choo Choo, All in the Family, Loads of Love Accessories, It's Your Birthday, Track roller wheel
Card: Tempting Turquoise, Whisper White, Basic Black
Ink: Black Stazon, Kiwi Kiss, Bashful Blue, Tempting Turquoise, Riding Hood Red, Basic Grey

Other: Stampin dimensionals

Friday, June 4, 2010

I'm back ....

Well my break from blogging was a little longer than I had anticipated, but the cold I have had has just wiped me out, and I have been absolutely exhausted. However I am on the mend now, and have a new card to share with you.

This is the card I have been doing in my workshops this month. It uses lots of new products from the Autumn/Winter mini catalogue.The card base is rich razzleberry, which I have teamed up with the new cottage wall dsp, the vintage vogue stamp set and the very vintage wheel. I love the very vintage wheel. It has a beautiful butterfly in it, which was a surprise when I used it the first time, as it is not shown in the catalogue.

Here is a close up of the friends panel.
I stamped the image twice and then cut out one of the "Fs" and mounted it over the other with dimensionals. A very simple card, but I like it.

I will have another card to show you in a couple of days (I promise!).

Keep on creating

xx Nicky


Supplies

Stamp set: vintage vogue
Ink: Rich razzleberry
Card: Rich razzleberry
DSP: Cottage wall
Other: Very vintage wheel, stampin dimensionals